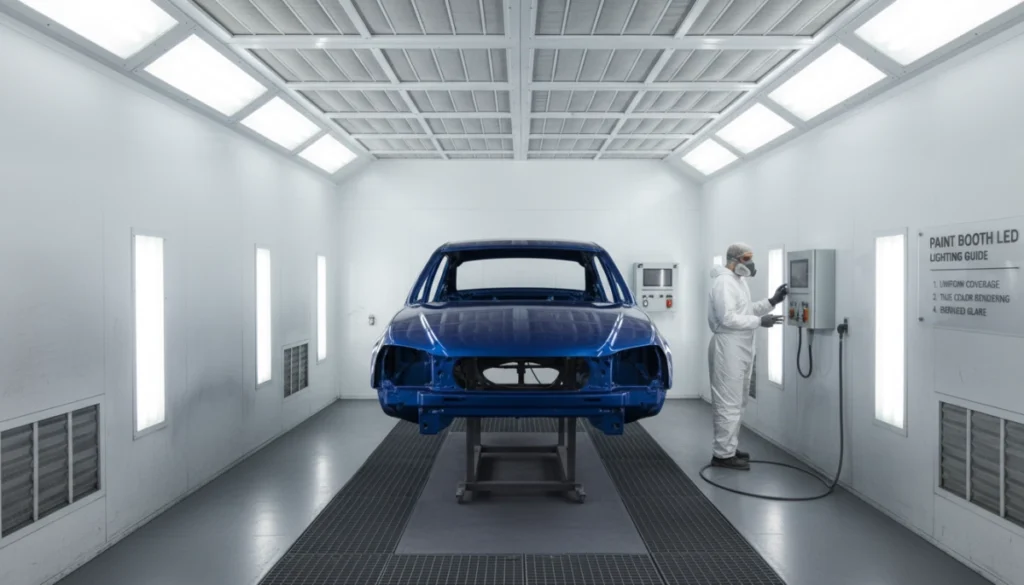
Poor lighting is one of the most overlooked reasons for rework in automotive finishing. A paint job that looks perfect under dim or color-shifted booth lights can show mismatched panels, missed dust nibs, or uneven clear coat the moment the car rolls into daylight. This guide covers why LED lighting makes a practical difference in a spray booth, what specifications actually matter, how to set up a system correctly, and what it takes to stay compliant.
Page URL: https://sprayboothmanufacturer.com/product/
Why LED Lighting Makes a Difference in a Paint Booth
Traditional fluorescent and HID fixtures have a few problems that show up directly in finish quality.They flicker, emit yellowish and dim light that distorts color perception, and produce excess heat to impact the booth environment. And they dim progressively over their service life, meaning your lighting conditions a year into ownership aren’t the same as day one.
LED fixtures address all of these at once. The output is steady, the color temperature stays consistent across the fixture’s full lifespan, and the heat output is minimal. The energy savings are real — most shops see 50% to 70% lower lighting-related electricity consumption after switching — but for the painter behind the gun, the more immediate benefit is simply being able to see the work accurately.
| Feature | Traditional Fluorescent/HID | LED |
|---|---|---|
| Energy Consumption | High | Low — up to 70% savings |
| Lifespan | 8,000–15,000 hours | 50,000+ hours |
| Heat Output | Significant | Minimal |
| Color Accuracy | Often yellow or dull | High CRI, daylight-accurate |
| Durability | Fragile glass tubes | Impact and vibration resistant |
The practical result of better lighting is fewer redos. When you can see runs, sags, dry spots, and dust nibs while the paint is still wet, you fix them then — not after the car has left the booth and the customer has already seen it.
The Specifications That Actually Matter
Not all LED fixtures are suitable for a spray booth. Here’s what to focus on when evaluating options.
Color Rendering Index (CRI)
CRI measures how accurately a light source renders color compared to natural daylight. For automotive paint work, a CRI of 90 or higher is the standard. Below 90, metallic and pearl finishes don’t show their true character under the lights — what looks right in the booth shifts when the car moves outside. Mottling and striping in metallic paints are particularly easy to miss under low-CRI lighting. This is the single most important specification for paint quality.
Color Temperature
The target range for automotive finishing is 5000K to 6000K — the daylight spectrum. This neutral white light lets you match colors accurately without the warming or cooling shift that lower or higher Kelvin ratings introduce. Lights in the 4000K range have a blue-white bias; below that, you’re into warm yellow territory that makes color matching unreliable.
Lumen Output and Coverage
For the work surface itself, you want 100 to 150 foot-candles of illumination — roughly 1,000 to 1,500 lux. For a standard 24-to-27-foot automotive booth, that typically means 10,000 to 15,000 lumens per fixture, with overhead and sidewall coverage combined to eliminate shadow zones under fenders, along the lower rockers, and inside door jambs.
IP Rating
Spray booths are harsh environments. Overspray, humidity, cleaning solvents, and regular wash-downs all create conditions that will destroy unprotected electrical fixtures. An IP65 rating means the fixture is fully dust-tight and protected against water jets from any direction. IP66 and IP67 offer higher water resistance for environments with heavy wash-down exposure. Don’t install anything rated below IP65 inside a spray booth.
Hazardous Location Certification
The interior of a spray booth is classified as a hazardous location because of flammable solvent vapors. Fixtures inside the spray zone need to be rated Class I, Division 1 or Division 2 under NEC classification — meaning they’re designed and certified to not ignite flammable vapors. This isn’t optional. OSHA 29 CFR 1910.107 and NFPA 33 both require it, and your insurance and fire marshal will too.
| Specification | Target | Why It Matters |
|---|---|---|
| CRI | 90+ | Accurate color matching |
| Color Temperature | 5000K–6000K | Daylight-accurate, no color shift |
| Lumen Output | 100–150 foot-candles at work surface | Eliminates shadow zones |
| IP Rating | IP65 minimum | Dust and moisture protection |
| Hazardous Rating | Class I, Div 1 or 2 | Required for spray zone compliance |
Types of Fixtures and How They Work Together
Getting shadow-free lighting across a full vehicle requires more than one type of fixture. Overhead coverage handles the broad horizontal surfaces — roof, hood, trunk — but it leaves the sides, rockers, and lower panels in shadow. A combination of fixture types is what actually covers the whole car.
Overhead high-bay fixtures are the primary light source. They flood the ceiling area and provide general coverage across the top of the vehicle. Spacing them evenly is important — a spotlight pattern with bright and dark areas is worse than lower overall output that’s consistent from front to back.
Sidewall LED panels are what solve the shadow problem on doors, fenders, lower bumpers, and rocker panels. Mounted vertically along the walls at mid-to-lower height, they direct light horizontally across the vehicle’s sides at angles that overhead fixtures can’t reach. For any shop doing serious paint work, sidewall coverage isn’t optional.
Portable task lights and inspection stands are useful for tight spots — engine bays, door jambs, wheel wells — and for final inspection passes to find contamination before the car leaves. Having a high-output portable light you can position at any angle is a low-cost addition that catches the things fixed fixtures miss.
Modular LED strip systems work well for retrofitting older booths or filling in non-standard layouts where fixed fixtures don’t cover everything cleanly. They can be linked and configured to match almost any booth shape or length.
The combination of overhead and sidewall fixtures creates what amounts to surround lighting — the vehicle is lit from multiple directions simultaneously, which is what eliminates shadows rather than just moving them. A painter working under this kind of setup can see the paint surface consistently from any angle throughout the application process.
Installation: Where Most Shops Make Mistakes
Fixture Placement
The goal is uniform coverage without bright spots or dark zones. For ceiling fixtures, space them evenly rather than clustering in the center. For sidewall panels, angle them slightly upward toward the lower panels of the vehicle rather than straight horizontal — this catches the rocker panels and wheel wells that are typically the hardest areas to light.
Height matters. Ceiling fixtures need to stay high enough to stay out of the spray gun’s working path, but low enough to maintain effective lux levels at the work surface. Sidewall panels at hip to shoulder height on the painter produce the most useful coverage on door and body panels.
Wiring and Power
All wiring inside the spray zone needs to run in vapor-tight sealed conduit. Exposed wiring in a solvent environment is both a compliance failure and a safety hazard. Verify that your circuit can handle the total amperage load before installation — and keep the lighting circuit separate from heavy equipment that creates voltage fluctuations.
Proper grounding is required both for safety and to prevent electrical interference with other shop equipment. In a hazardous location environment, this isn’t something to cut corners on.
Common Installation Problems
Flickering or dimming immediately after install is almost always one of three things: a loose wire connection somewhere in the run, a dimmer that isn’t compatible with the LED driver in the fixture, or a circuit that’s already loaded with other equipment and can’t handle the additional draw. Check these three things before assuming a fixture is defective.
Maintenance: Protecting Your Light Output
Lens Cleaning
Overspray builds up on fixture lenses faster than most shop owners expect. A thin layer of dried paint on the lens can cut light output by 50% or more. Wipe down lenses daily with a lint-free cloth and a mild, non-abrasive cleaner. Avoid harsh solvents that can cloud polycarbonate lenses over time.
Peel-off lens protector films are worth using — they’re inexpensive, designed to catch overspray, and let you replace the film rather than scrub the actual lens surface.
Seal and Gasket Inspection
Check the housing seals monthly. A cracked or compressed gasket means the fixture is no longer truly sealed, and paint particles and fumes can get inside the electronics. Most premature LED failures in spray booths trace back to compromised seals rather than actual diode failure. Catching a failed gasket early is cheap; replacing an electronics assembly is not.
Heat Management
LEDs last 50,000+ hours under normal conditions, but heat is the primary factor that shortens that lifespan. Make sure your booth ventilation is functioning correctly — elevated ambient temperatures inside the booth accelerate driver failure. If you’re seeing fixtures fail well before their rated hours, excessive heat is usually the cause.
| Component | Action | Frequency |
|---|---|---|
| Lenses | Wipe with lint-free cloth | Daily |
| Seals and gaskets | Inspect for cracks | Monthly |
| Mounting hardware | Check tightness | Monthly |
| Drivers and wiring | Visual inspection | Quarterly |
Compliance: What the Regulations Require
OSHA 29 CFR 1910.107 requires that lighting used in or near spray finishing areas is designed to prevent ignition of flammable vapors. This means fixtures inside the spray zone must carry a listed hazardous location rating.
NFPA 33 classifies the interior of a paint booth as a Class I, Division 1 or Division 2 hazardous location and requires that all electrical equipment — including lighting — meets the corresponding rating. This applies to both new installations and retrofit upgrades.
UL and ETL listings confirm that a fixture has been independently tested to meet North American electrical safety standards. These certifications are what building inspectors and fire marshals look for when reviewing your installation.
DLC qualification indicates that a fixture meets energy efficiency thresholds that many US utilities recognize for rebate programs. If your area offers utility rebates on lighting upgrades, DLC-qualified fixtures are usually the requirement to qualify.
Cost and Return on Investment
The upfront cost of quality LED fixtures is higher than replacing fluorescents with more fluorescents. The payback timeline is typically 12 to 18 months for most shops, driven by three factors.
Energy savings are the most immediate. LED fixtures pull significantly less wattage for the same or better lumen output — the 50% to 70% reduction in lighting energy consumption is consistent across most upgrade projects.
Maintenance savings follow. Fluorescent tubes, ballasts, and starters fail regularly in spray booth environments, and every hour the booth is down for lighting repairs is an hour it isn’t producing work. LED fixtures in sealed housings run for years without ballast failures or tube replacements.
The quality improvement is harder to put a dollar figure on, but reducing rework by even a small percentage — catching problems during application rather than after the car leaves — adds up significantly over the course of a year in a high-volume shop.
| Feature | Fluorescent | LED |
|---|---|---|
| Initial Cost | Lower | Moderate to higher |
| Energy Consumption | High | Low — 50–70% savings |
| Lifespan | 10,000–20,000 hours | 50,000+ hours |
| Light Quality | Dims over time | Consistent throughout life |
| Maintenance | Frequent ballast and tube swaps | Near zero |
Common Questions
What CRI do I actually need? For automotive paint work, 90 or higher is the minimum. If you’re doing high-end custom or specialty finishes, pushing toward 95+ gives you even better accuracy on metallics and pearls. Anything below 90 introduces color shift that you won’t catch until the car is outside.
Do I need explosion-proof fixtures? If the fixtures are inside the spray zone, yes. Class I, Division 1 or Division 2 rated fixtures are required by OSHA and NFPA 33 for spray booth interiors. This isn’t a gray area — it’s what compliance requires and what your fire marshal will look for.
Can I retrofit my existing fluorescent fixtures? Yes. You have two options: bypass the existing ballasts and use LED tube replacements, or replace the entire fixture with a sealed LED panel. Full fixture replacement is usually the better long-term choice because it gives you a properly sealed housing and better light distribution, but tube retrofits work in situations where full replacement isn’t practical.
How long will quality LED fixtures actually last? Industrial-grade LEDs are rated for 50,000 to 100,000 hours. At 40 hours per week of use, that’s 25 years at the lower end. The caveat is that this assumes proper installation, intact seals, and reasonable operating temperatures. Heat and compromised seals are what shorten that lifespan in practice.
What’s the right lumen count for a standard automotive booth? Target 100 to 150 foot-candles at the work surface. For a standard 24-to-27-foot booth, that typically means around 10,000 to 15,000 lumens per overhead fixture, combined with sidewall coverage to handle the lower panels and sides of the vehicle.
Tell Us What You’re Working With
Share your booth dimensions, current lighting setup, and the type of work you’re finishing. We’ll put together the right LED lighting configuration for your operation and send a detailed quote — usually within 48 hours.
Related Pages
- Bus Spray Booth Design Guide → https://sprayboothmanufacturer.com/transit-coach-spray-booth-requirements/
- Truck Paint Booth Guide → https://sprayboothmanufacturer.com/truck-paint-booth-semi-truck-spray-booth-specifications-buying-guide/
- Other related products → https://www.autokemanufacture.com/product
- Contact our sales Team → https://sprayboothmanufacturer.com/contact-us/
✅ CE Certified | ✅ ISO 9001:2015 | ✅ Factory Direct | ✅ Ships to 60+ Countries | ✅ 1-Year Warranty | 🔒 HTTPS Secured